


Many of our customers have asked, "What is a method statement, and do I need one?"
Customers have also been known to feel apprehensive about getting the document right and including all the required information. So let's first look at what a method statement aims to achieve, and this is:
- To guide someone through the correct steps to complete a task.
- To carry out the above safely.
So, essentially, a method statement provides instructions and a safe system of work for carrying out a task. It not only tells people the correct way and order to do things but can also instruct on what not to do.
A method statement is a comprehensive document that details the procedures for executing a specific task or project, with a strong emphasis on safety, efficiency, and compliance. It serves as a resource for workers, outlining the step-by-step processes required to complete the job correctly and safely. The document highlights essential safety precautions designed to mitigate potential hazards associated with the task. This may involve outlining personal protective equipment (PPE) requirements, emergency procedures, and detailing the safety measures that must be implemented throughout the project duration. Method statements are particularly crucial for high-risk activities, such as those found in construction, engineering, or hazardous environments. By outlining clear guidelines and best practices, they help prevent accidents, protect workers' health, and ensure that all operations comply with local and national health and safety regulations. A method statement should be articulated in a clear, concise, and easily understandable manner, ensuring that it is tailored specifically to the task in question.
What is a Method Statement's Relationship to Risk Assessments?
Method statements are integral to safety protocols, often utilised in conjunction with risk assessments. However, it is crucial to understand that they serve distinct purposes. Risk assessments are focused on identifying potential hazards associated with a particular job or environment. In contrast, method statements provide a step-by-step guide on how to perform the work safely, taking into account the hazards identified in the risk assessment. This relationship ensures a thorough approach to safety where hazards are acknowledged and addressed through deliberate planning and action.
What is a Method Statement Benefit?
Implementing method statements offers several key benefits, which include:
- Reduction of Accidents and Injuries: By providing explicit instructions and controls, method statements help to minimise the likelihood of accidents, thereby protecting workers and others in the vicinity.
- Enhanced Communication and Understanding: Method statements foster improved communication among team members by ensuring everyone is aware of the procedures and safety measures, promoting a cohesive working environment.
- Compliance with Health and Safety Regulations: Adhering to method statements helps organisations meet legal and regulatory requirements, thus avoiding potential legal repercussions and enhancing overall workplace safety.
- Documentation of Safe Practices: Method statements serve as a written record of the safe working practices established for specific tasks, which can be referenced for training purposes and audits.
What is the purpose of Method Statements?
The primary purpose of method statements is to deliver clear and concise instructions for executing a task safely and efficiently. These documents help in identifying potential hazards associated with the task and outline the necessary control measures to mitigate those risks effectively.
Most of us envisage a method statement as a text document or form that covers the following key elements:
- Scope of Works: This is the descriptive title of the method statement, outlining the basic task
- Start of works: This section outlines the necessary preparations before commencing the task, including reading a risk assessment and COSHH assessment, wearing personal protective equipment (PPE), using signage, and checking the tools to be used, among other tasks.
- Step-by-Step Process: This section provides safe working instructions and the correct sequence for completing the task.
- Finishing: This section instructs on securing or leaving the work area safe, removing any tools or rubbish, adding or removing signage, and other related tasks.
Yet, some of the best method statements contain no or very few words. Really!
What is a Method Statement That Has No Words?
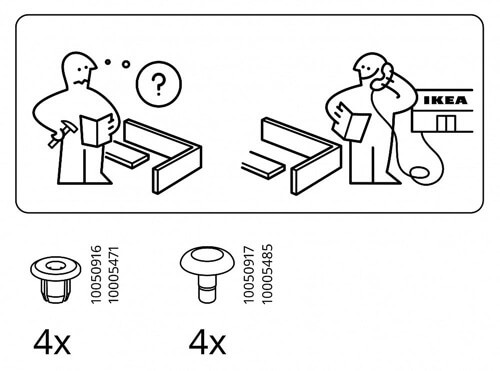
Think of Ikea, the world's friendly flat-pack furniture store. You've just bought a new chest of drawers and are about to assemble it. After opening the box, the first thing you do is look for the method statement, also known as the assembly instructions. Regardless of which languages you read, you will be able to follow the pictograms to determine :
Which tools do you need, and how many of each component should be in the box?
You can then proceed to the first part of the assembly, where the pictograms instruct on the correct way to carry out the task.
Using ticks and crosses indicates what should be done and what should be avoided.
So, if you need to write a method statement for a work task, don't overcomplicate it. List the safe working practices to follow in the correct order and the things to be avoided.
Utilising diagrams, illustrations, and photographs can significantly amplify the clarity and effectiveness of a method statement, particularly when addressing complex tasks or collaborating with diverse teams that may face language barriers. Visual aids play a vital role in facilitating workers' understanding of procedures, identifying potential hazards, and representing safety protocols more effectively.
Here's a detailed exploration of the benefits of pictorial method statements:
- Improved Comprehension: Visual formats can convey intricate information more swiftly and clearly than written text alone, making them especially beneficial for non-native speakers or individuals who possess a strong visual learning preference. By integrating visuals, workers can grasp essential concepts and instructions more easily, avoiding confusion caused by technical jargon.
- Enhanced Engagement: Incorporating pictures, diagrams, and visual elements can make method statements more stimulating and engaging. Engaged workers are more likely to thoroughly read and comprehend the material, which in turn fosters a deeper understanding of the procedures outlined in the statement.
- Reduced Ambiguity: Visual representations can effectively eliminate ambiguity by presenting processes and instructions clearly and straightforwardly. This clarity ensures that all team members interpret the procedures uniformly, thereby minimising the risk of errors or accidents that may arise from miscommunication or misunderstanding.
- Clarification of Procedures: Diagrams, photographs, and universally recognised symbols can visually demonstrate how to operate equipment, put on personal protective equipment (PPE), or perform specific tasks. This visual guidance enhances the training experience and provides a quick reference that workers can consult in real time, reinforcing proper practices.
- Better Memory Retention: Research indicates that visual information is often more memorable than textual content. By employing visually-driven materials, workers are more likely to retain safety procedures and best practices, which is crucial for maintaining a safe work environment.
To summarise, incorporating visual aids into method statements not only streamlines communication but can also enhance overall safety and efficiency in the workplace.
The Language Of Symbols
The symbols and icons in the flat pack manual represent a universal language comparable to international sign language, guiding every step. For instance, an arrow may indicate the direction in which to insert or tighten a component, while a line with an end cap could represent the end point of a part's insertion. Icons depicting tools next to a piece signify the specific tool required for that step, such as an Allen key or screwdriver.
Each symbol or icon is designed with simplicity in mind, aiming to make the assembly process straightforward regardless of the assembler's experience level. A circle with an "X" through it warns against a particular action, such as using a power drill, which could damage the material. Meanwhile, a hand pointing means you should manually adjust or align the piece at that stage.
Using the flat-pack Manual, you will follow the correct steps to complete a task.
You will also carry out the task safely, avoiding tools or processes that could cause harm or damage.
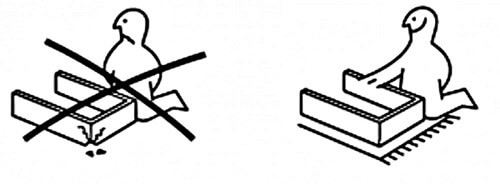
The example below illustrates that assembly should be carried out on a soft surface to prevent damage to the product.
To follow a pictorial method statement and assemble flat-pack furniture effectively, you must approach the task with organisation and attention to detail. Start by reading the instruction manual to grasp the overall assembly process and to identify any potential challenges you might encounter.
Here's a more detailed guide to help you through the process:
- Read the Manual Thoroughly: Before beginning assembly, take the time to read the entire instruction manual. Understanding the sequence of steps and the overall assembly process will help you visualise the final product and anticipate challenges.
- Identify Parts and Hardware: Carefully locate all pieces and hardware items listed in the Manual. It's a good idea to lay these out and organise them. Use organised containers to separate screws, bolts, and different types of hardware; this will minimise the risk of losing parts and make it easier to find what you need during assembly.
- Clear a Workspace: Choose a spacious, flat, and well-lit area for your assembly process. A clean workspace will provide ample room to spread out all components and will make the assembly process more manageable.
- Have the Right Tools at Hand: Before starting, ensure you have all the necessary tools at hand. Commonly needed tools include screwdrivers (both flathead and Phillips), Allen keys (if specified), and a rubber mallet for parts that may need gentle persuasion into place. Having everything within reach will keep the assembly process smooth and efficient.
- Step-by-Step Assembly: Follow the instructions outlined in the Manual, starting with the first step, and complete each step precisely without skipping any. Each part typically builds upon the previous one, so it's essential to adhere to the specified order.
- Refer to Diagrams: Pay close attention to the diagrams included in the Manual. These visual representations often illustrate how different components fit together, which can clarify written instructions and prevent mistakes.
- Don't Tighten Too Soon: When you're attaching pieces, resist the urge to fully tighten screws or bolts until the entire section is complete. This practice allows for slight adjustments, ensuring that all parts align perfectly before the final tightening.
- Seek Assistance: For larger, bulkier items, it can be beneficial to have a second person assist you. They can help stabilise pieces, hold components in place, or offer an extra set of hands when assembling intricate parts.
- Check for Squareness: Before securing any back panels or finishing touches, double-check that the frame is square. Measure diagonally from corner to corner to confirm that all angles are correct. A square frame will enhance both the appearance and stability of the finished product.
- Tighten All Fasteners: Once everything has been lined up correctly, re-tighten all screws, bolts, and fixings securely. Ensure each connection is snug, but be cautious not to over-tighten as this can damage the furniture.
- Test the Assembly: After completing the assembly, test the stability and functionality of the furniture to ensure it meets your expectations. If it's a bed, chair, or any weight-bearing structure, apply pressure to ensure it can support weight safely and securely.
- Make Adjustments: If necessary adjustments are required, such as aligning doors or adjusting shelving heights, refer to the Manual for guidance. Carefully follow the guidelines to make these changes without compromising the structure.
- Common Mistakes to Avoid: Avoid the temptation to rush through the assembly steps. Taking your time can help prevent errors and ensure a more polished final result. Before starting, double-check all parts against the provided parts list in the Manual. Ensuring nothing is missing will save you time and frustration. Always refer to the Manual for specific assembly instructions for each component, as skipping steps or deviating from the guidelines can lead to complications later on.
By adhering to these detailed steps and maintaining focus on the task at hand, you can successfully assemble your flat pack furniture while avoiding common pitfalls. A methodical approach will ensure durability and satisfaction with your final product.
Creating a Written Method Statement
A method statement is a clear, logical, step-by-step explanation of how a specific task should be conducted. It considers the health and safety implications of the task and includes control measures to reduce risk.
It outlines how a task should be carried out safely and efficiently, and may also be referred to as a safety work method statement (SWMS), safe system of work (SSW)
In essence, a method statement is about simplicity and clarity. It should be easily understood and not ambiguous.
Key Points to include:
Introduction: This section should include the title, which should be concise, descriptive, and succinct. It should also include the details of the project for which the method statement is being used, as well as the name of the company that prepared it.
Scope of Works: This outlines the scope of the method statements. It's the method statement's index and may read:
- Start of works.
- Task.
- Finishing.
Start of works: This section lists the safety checks and preventative measures to take before beginning the task, and may include:
- Reading relevant COSHH documents and Risk Assessments.
- Obtain any necessary work permits, such as a hot work permit, if required.
- Inspect the work area and verify the availability of all essential tools and materials.
- Protect the work area and surroundings, including signage and barriers, as required.
Task: List the task in a logical sequence, detailing how the job should be carried out safely with minimal risk.
Finishing: This involves leaving the work area safe, including the removal or secure storage of waste and surplus materials.
A video tutorial on creating method statements, along with a free template, can be found at HSEDocs.com, which also offers tutorials on risk assessment and COSHH assessment.